Just a spot to upload random guitar pics for online linking.
 |
| Dean MD24 Floyd Rose leveling attempt. |


To be continued.
|
| Dean MD24 Floyd Rose leveling attempt. |
 |
| Hello Kitty Strat. |
I bought the 50th Anniversary Hello Kitty Strat from the Fender x Hello Kitty collection on a whim. I always did want a single humbucker fixed bridge Strat since I grew up playing guitar as the Fender Tom DeLonge models and original Hello Kitty guitar were introduced.
I am enjoying the Hello Kitty Strat in its stock form. The guitar’s build is Classic Vibe-level in terms of its fit and finish. The unique appointments are purely cosmetic, like the pick guard, white tuners, red position markers on a maple fretboard, matching pink headstock, and pink volume knob text. But at the end of the day, it’s a comfortable guitar to play. The frets are smooth and I am familiar with the feel of the Squier CV necks.
The stock humbucker is fairly low output, which I am fine with at this point in my tone chase. If I had bought the original Strat, I would’ve certainly changed out the pickup for something high output like a Duncan JB or Invader. However, I can get more than enough gain between my Peavey 6505 and various modeling solutions. I also want to be able to play cleaner sounds, which this guitar’s humbucker allows me to do.
Here’s a video of some higher gain amp presets in my Fractal FM3. The pickup is low output, so I can hear the individual strings fairly well.
I received my Squier Bass VI from Chicago Music Exchange early. It was estimated to arrive in November, but was delivered a month early. The exterior shipping box arrived without issue, but the inner box from Fender to CME was in poor condition for a new guitar.
 |
| Beat up box from Fender to CME. |
 |
| Bass VI in Antigua. |
I first played through some Marshall-y patches through my Fractal FM3 to make sure the electronics were still functioning. I immediately started coming up with ideas with the Bass VI.
The fretted note at the 12th fret on the low E string was sharp by 15 cents. Intonation of the other strings was tolerable. I noticed that the Bass VI came with a Mustang bridge, which was probably added when the model transitioned from the Vintage Modified to Classic Vibe line. Hopefully the Mustang bridge will have enough range to set the low E intonation.
Below is a clip of the Bass VI played in lower and higher registers. The bass sounds were achieved with the middle pickup through the US Dripman Nrm Amp from Line 6 Helix Native. The clean guitars used the bridge (single notes) and neck (chords) pickups with the strangle switch on through the UADx US Dream 65 Amp plugin.
More to come.
 |
| Vox AC15C1. |

 |
| Cavalier Nashville Lion and Lion King pickups. |
I bought a set of Cavalier pickups to install into my Squier Classic Vibe 50s Tele. I selected the Nashville Lion for the bridge position as it appeared to sit in the middle of all offerings. I picked the Lion King because it seemed like the most popular neck mode.
 |
| Squier stock CV Tele pickups. |
The DC resistances of the Nashville Lion and Lion King were 8.14k and 8.13k respectively. The stock bridge and neck pickups measured 7.30k and 7.61k respectively. At the similar typical Tele pickup heights, the Cavalier pickups are less hot and not as harsh sounding. At the same time, the Cavalier pickups are fuller sounding. It was a bit difficult to get the outputs to be the same with the difference in frequency response. 1/8th turns on the pickup mounting screws brought the output from a little low to a little to high. The differences in frequency response are most apparent in the middle position, with the Squier set sounding more hi-fi and the Cavalier set sounding more colored.
The Squier pickups are not unique to the model. Older iterations of the Squier Classic Vibe 50s guitars in the 2010s had different pickups than the 60s models. However, these stock pickups have the same sticker codes as the pickups that I pulled out of my Squier Classic Vibe Baritone Tele Custom, a guitar with more 60s appointments.
Prior to the pickup swap, I shielded the Tele’s control cavity. This reduced a significant amount of noise that be I was experiencing before. There are still angles where the hum becomes annoying, but there is a wider range of directions I can face without the noise becoming too much of a problem.


I bought a Weber 12A125A speaker in my chase for the ideal 5E3 tone. I originally bought a Speed Shop A12Q for Tweed tones, but it turned out to be based on an early 60s speaker. Many forum posts for the A12Q remark that it is basically a Weber 12A125S, a speaker that is an Oxford replacement. A12Q did get convincing Neil Young tones, and is likely why the speaker is popular with 5E3 players. Neil Young uses a C12N speaker with his Tweed Deluxe, so the A12Q would be closer to being period correct for that sound. The top end was a little too smooth for me.

The 12A125A is the speaker I should’ve bought in the first place. It reminds me of a thicker version of the P12Q that is in the Redwirez impulse response library, which was my reference. The bright top end works well with the dark 5E3 tone.
I can see why 5E3 user may prefer the in-room tone of the A12Q, but the 12A125A’s recorded tone is exactly what I was looking for. My experience with micing the speaker so far is that I have to back the microphone off an inch more than I would with a Celestion-style speaker. When using ribbon microphones, I have to back off to about 6” off the grille to get the low end where I want it. The sweet spot for me is typically somewhere within the dust cap.


 |
| 12 String Jazzmaster. |
I preordered the Squier 12 string Jazzmaster when I saw that it was available. The build of the guitar was solid. The fixed bridge probably eliminated many of the quirks associated with setting up a Jazzmaster. The neck felt good, although it took me a minute to adjust to a 12 string guitar.
My initial impression from playing through the amp models in my HX Stomp was that I would mostly play this guitar clean or mildly overdriven. I prefer to focus on chord inversions rather than play full barre chords to hear the octave effect.
 |
| Speed Shop A12Q speaker. |
After some deliberation, I ordered a Speed Shop A12Q AlNiCo speaker to use with my 5E3 head. I was deciding between the Weber 12A125A and the Speed Shop A12Q for a while. The A12Q is a 20W Weber speaker built to Speed Shop’s specifications. It’s described as an idealized Jensen P12Q sound, supposedly with less highs than the 12A125A.
The positive reviews of the Speed Shop speaker on various forums led me to purchasing one. The price difference between the speakers was negligible. The speaker is still within the 12A125 family, so I ended up supporting both companies.
 |
| Weber identification sticker for A12Q. |
It took exactly 2 weeks to take delivery of the speaker. The speaker’s build date was a week after my order went in, earlier than the quoted build date.
 |
| Speaker mounted in cabinet with grill removed. |
I put the speaker in an unloaded Tech 21 1x12 cabinet that I got directly from Tech 21 for $57, including shipping. The cabinet is used interchangeably for the Tech 21 Trademark 60 and Power Engine 60 amps. Although the whole cabinet might be MDF, the Trademark series seems to be respectable enough from a tonal standpoint. I had to buy some 10-32 x 1 1/4” bolts to mount the speaker. It didn’t come with any speaker wire, so I bought a Fender internal combo speaker cable to wire up the speaker. I spent about $230 for the whole cabinet assembly, so I’m not concerned about getting a 100% authentic pine cabinet Tweed Deluxe experience. I do want to experience the 5E3 circuit through a Jensen-voiced 12” speaker rather than a Celestion.
 |
| Less than ideal speaker cable mounting. |
I was able to use the power cord holder to secure the speaker cable’s make TS jack. I am connecting to an external speaker cable using a female to female 1/4” coupler. The speaker cable termination isn’t the most elegant installation, but I don’t want to sink any more money into the project.
 |
| A12Q speaker in Tech 21 1x12 cabinet. |
I am liking how the speaker sounds in the room with the 5E3. I am of course taking impulse responses of the speaker cabinet to learn more about how my modelers and amps sound through the speaker at different mic positions. My initial observations from listening to the speaker are that there are more low mids and less highs than I expected. I am moving my dynamic mics back about an inch off the grill due to the proximity effect. The captures of mics close to the center of the dust cap are very useable.
Link to IRs: here
While my focus is on getting tones with the 5E3 pairing, I may have stumbled upon some good sounds with my 5F1/5F2A amp. I ran some WAVs of the loaded down amp through IRs and really liked the tones in isolation.
Edit - 1/13/25 - I hadn’t been getting along with the speaker as well as I had hoped in the Tech 21 Cabinet. The tone seemed to be too focused in the lows and mids. It prompted me to buy a Weber 12A125A to chase the ideal 5E3 tone. Over the past few months, I’ve paid a little more attention to matching speakers and cabinets. I first moved the 12A125A into my Eminence XTC112-BT cabinet, and shot IRs with my mic collection.
I have moved onto the A12Q and have a much better appreciation for the speaker now. It now sounds like the 12A125A with a bigger low end and less of a 5k spike. The honky mids are gone and the speaker is much more usable.
To be continued.
I’ve been dipping my toes into recording with mics again, after using guitar amp sims, IRs, VST instruments, and samples for years.
I started to convince myself that recording acoustic guitar at home and remotely would be viable. I quickly learned that choosing guitar picks was integral to the sound. I initially went with the brightest pick that I could find, a thin 0.60mm Dunlop Ultex. I thought the 3U Audio Black CM1 was a good starting point.
I then experimented with darker tones by switching to picks like a 0.70mm Dunlop Tortex in the clip below. I wanted to minimize my small bedroom’s sound, so I started to use my dynamic mics. I wasn’t happy with the noise floor of a cranked mic preamp in my setup. I added a Cloudlifter CL1 to my setup, and got comparable output/noise to my other SDC mics. The Beyerdynamic M201TG works well on acoustic guitar for a dynamic mic, and it’s hypercardioid pattern rejects some room sound.
I have also gotten interested in recording drums with minimal microphones. I am not a drummer, more of a guitarist who decided to hoard drums. I will try out mono overhead, Recorderman, and Glyn Johns-style mic setups for my lo-fi compositions. I’ll stick with Superior Drummer with my more conventional ideas. I’ve been recording just 4 pieces so far: a Gretsch Energy 22”x22” bass drum, a Pork Pie 6.5”x14” Big Black brass snare, a 22” K ride, and a set of New Beat hi-hats.
 |
| Drums with mono overhead. |
I expanded my condenser mic collection to capture both stringed instruments and drum overhead: 3U Audio Teal CM1 SE, Oktava MK-012, Beesneez Lulu, and Beesneez BU87I C.
To be continued.
 |
| Layout and wiring mockup in AutoCAD. |
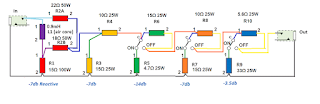 |
| M2 Attenuator wiring modified for my use. |
 |
| Preparing the chassis to be drilled out. |
 |
| Resistors populated and (-) wiring soldered. |
 |
| Completed wiring of attenuator. |
I jumped on a Monoprice Indio Classic V2 guitar on sale for $84 before sales tax. I’ve been on the lookout for an inexpensive HH guitar to stick my unused GFS Mean 90 humbucker-sized P90 pickup set into for a while now. I previously had these pickups in my Ibanez SZ520QM and enjoyed the tones from all positions.
 |
| Monoprice Indio Classic V2 prior to pickup swap. |
 |
| Stock control cavity. |
I quickly took a peek inside the control cavity to see what I would be dealing with. The pots were measured to be under 500kohm, at approximately 440kohm. I may reuse the pots, pickup switch, and jack. The tone cap is a 0.047uF, which I plan on swapping out for an Orange Drop 0.022uF cap that I have as a spare part. I will shield the control cavity with copper tape.
Edit - 10/25/21 - I took out the stock pickups in the guitar. The stock bridge and neck humbucker DC resistances measured 15.42kohm and 8.14kohm respectively. The bridge humbucker was fairly hot and strident for my tastes. The neck pickup wasn't too muddy for such a cheap guitar.
 |
| GFS Mean 90 wiring splices insulated with electrical tape. |
I cut the stock pickup leads about 1.5" away from the pickup switch, and spliced with the leads of the Mean 90s. I didn't have all of the materials (heat shrink, copper tape) to fully complete the installation. I insulated the hot conductor splices with 3M Super 88 tape, then wrapped the overall splice.
 |
| Mean 90 wiring, excerpted from this TalkBass post. |
The bridge Mean 90 (8.76kohm DCR) is much lower output than the stock bridge humbucker, and much more suited to my tastes. The bridge position is more low mid heavy and not as aggressive as the Wolfetone Meaner P90 in my SX Hawk guitar. The neck Mean 90 (7.95kohm DCR) provides an open, uncompressed sound in comparison to a typical neck humbucker. The tone of a P90 neck pickup with higher gain is much preferable to me than a humbucker.
The only downside to these P90 pickups is the hum. The middle position is hum cancelling; when switched back to a single pickup, the noise is quite noticeable. I am hoping that shielding the control cavity will lower the buzz that I get when facing a particular direction.
 |
| GFS Mean 90 pickup set mounted into Monoprice Indio Classic V2. |
 |
| Full body shot of guitar with Mean 90 pickups. |
I decided to swap out the stock pickups in my Epiphone Les Paul Traditional Pro guitar with a set of Wolfetone Dr. Vintage pickups. I mainly wanted a neck pickup that was clearer than the Alnico Classic Pro, and liked my experience with the Dr. Vintage in my Ibanez SZ520. I wanted to try a lower wind bridge pickup for clean and lower gain tones, and the Dr. Vintage bridge pickup made sense.
 |
| Wolfetone Dr. Vintage Set. |
The DC resistances of the Wolfetone set (Alnico 2) measured 8.2kohms and 7.6kohm on the bridge and neck pickups respectively. The Epiphone ProBucker 3 (Alnico 2) and Alnico Classic Pro (Alnico 5) read 8.7kohm and 7.7kohm respectively.
 |
| Reverse zebra Cellulose Acetate Butyrate bobbins. |
I was given the option of the butyrate bobbins and same day winding from order acknowledgement since the glossy ABS plastic wasn’t in stock. The cream butyrate bobbins actually matched well with the cream Epiphone hardware. The bobbins on the stock Epiphone pickups were very glossy in comparison. I went with the 4-conductor option to utilize the existing wiring inside the Epiphone Les Paul.
 |
| Stock Epiphone quick connect wiring. |
The guitar is a 2017 model, which was equipped with quick connect wiring harnesses in the factory. I wanted to keep the quick connect wiring in the event I ever wanted to swap pickups again. I came across screw terminal adapters for Epiphone pickups by Scirina Engineering on Reverb. The simplicity of the screw terminals was worth the cost over other adapters on Reverb/eBay.
 |
| Epiphone Probucker 3 and Alnico Classic Pro removed. |
 |
| Guitar with pickups removed. |
 |
| Quick connect adapter from Scrinia Engineering. |
The Dr. Vintage bridge emphasizes the higher mids, while the stock ProBucker was rounder in the bass/lower mid range. The Dr. Vintage bridge pickup seems like it will help in avoiding low end buildup in recording. I did like the bigger bottom end of the ProBucker for certain tones. Both bridge pickups were set up to be 3/32" and 5/64" away from the low and high E strings while fretting the 22nd fret.
The Dr. Vintage neck is much lower output than the Alnico Classic Pro, which is advertised to be a higher output and more modern than the ProBucker line. I originally had the Dr. Vintage neck pickup 1/8" away from the strings to match the previous installation of the Alnico Classic Pro, but brought it up to 3/32" to suit my tastes. With such a difference in output, it is difficult to compare. What I disliked about the Alnico Classic Pro neck in the past was how much the low end was pushed, even with the pickup lowered. The Dr. Vintage neck did not push the low end as hard, although I couldn't tell if it was due to a dip in low frequencies or if it was due to the lower output.
I originally thought I would be keeping the guitar stock indefinitely. I still like the stock pickups for certain tones, and have become familiar with the sound. The Dr. Vintage pickups make the guitar a more balanced instrument, which is what I want.
Clips to come.
I’ve owned a Roland Cube 60 modeling amp since 2004. I outgrew it once I started getting into playing though tube amps and VST amp modeling. I wanted to separate the amp into a head and cabinet so I could get more use out of the amp. Unfortunately I learned that the Cube 60 baffle cutout was too small for typical 12” speakers. The stock full range Roland Cube 12” speaker is a different shape than a typical 12” guitar speaker.
 |
| Roland Cube 60 Cabinet with Mojotone 12” to 10” Baffle Converter. |
I didn’t have a way to cleanly enlarge the hole in the baffle. The easiest option in my mind was to use the cabinet for a smaller 10” speaker. I ran across plywood baffle converters from J Design and Mojotone. I went with the Mojotone, since it was suited for front mounting of speakers. The Mojotone converter comes with 4 keps nuts to hold a 10” speaker onto the converter’s speaker mounting bolts. I bought some slightly longer M4x35mm bolts to mount the converter onto the Cube’s MDF baffle. The stock speaker mounting bolts are M4x25mm.
I will be trying out a Jensen C10Q and an Eminence GA10-SC64 in the cabinet. Based on my encouraging experiences with recording with the Jensen P10R speaker, I want to explore more flavors of 10" speakers with my 5F1/5F2A head and Pro Junior IV.
If the cabinet records well and I can make some useful impulse responses out of it, then I plan on buying some more 10" speakers to rotate in and out. I will keep the metal grille off, so the front loading of speakers should lead to quick speaker swaps. I am hoping that the front porting and the inside insulation will not significantly impact the sound negatively in a close mic'd scenario.
Edit - 6/11/21 - I loaded the Eminence GA10-SC64 into the cabinet. I finger tightened the keps nuts of the baffle to secure the speaker. I got the feeling that the baffle is actually meant for rear loaded installations, but will proceed with using it as a front loaded cabinet.
 |
| Cabinet front loaded with speaker. |
 |
| 2021 Eminence GA10-SC64 Speaker. |
 |
| Jensen C10Q. |
Edit - 06/25/21 - The GA10-SC64 is very different from the P10R. I am not familiar with the nuances of American-style speakers, since there aren’t as many online audio examples as the British-style speakers. The P10R works well with tweed overdrive, while the GA10-SC64 fares better with cleans for my usage. The GA10-SC64 is not harsh, even with a microphone pointed directly at the center of the dust cap. Blends of my GA10-SC64 and P10R IR captures are pleasing, as the speakers seem to be complementary.
 |
| Capturing GA10-SC64 IRs with a Shure SM57. |

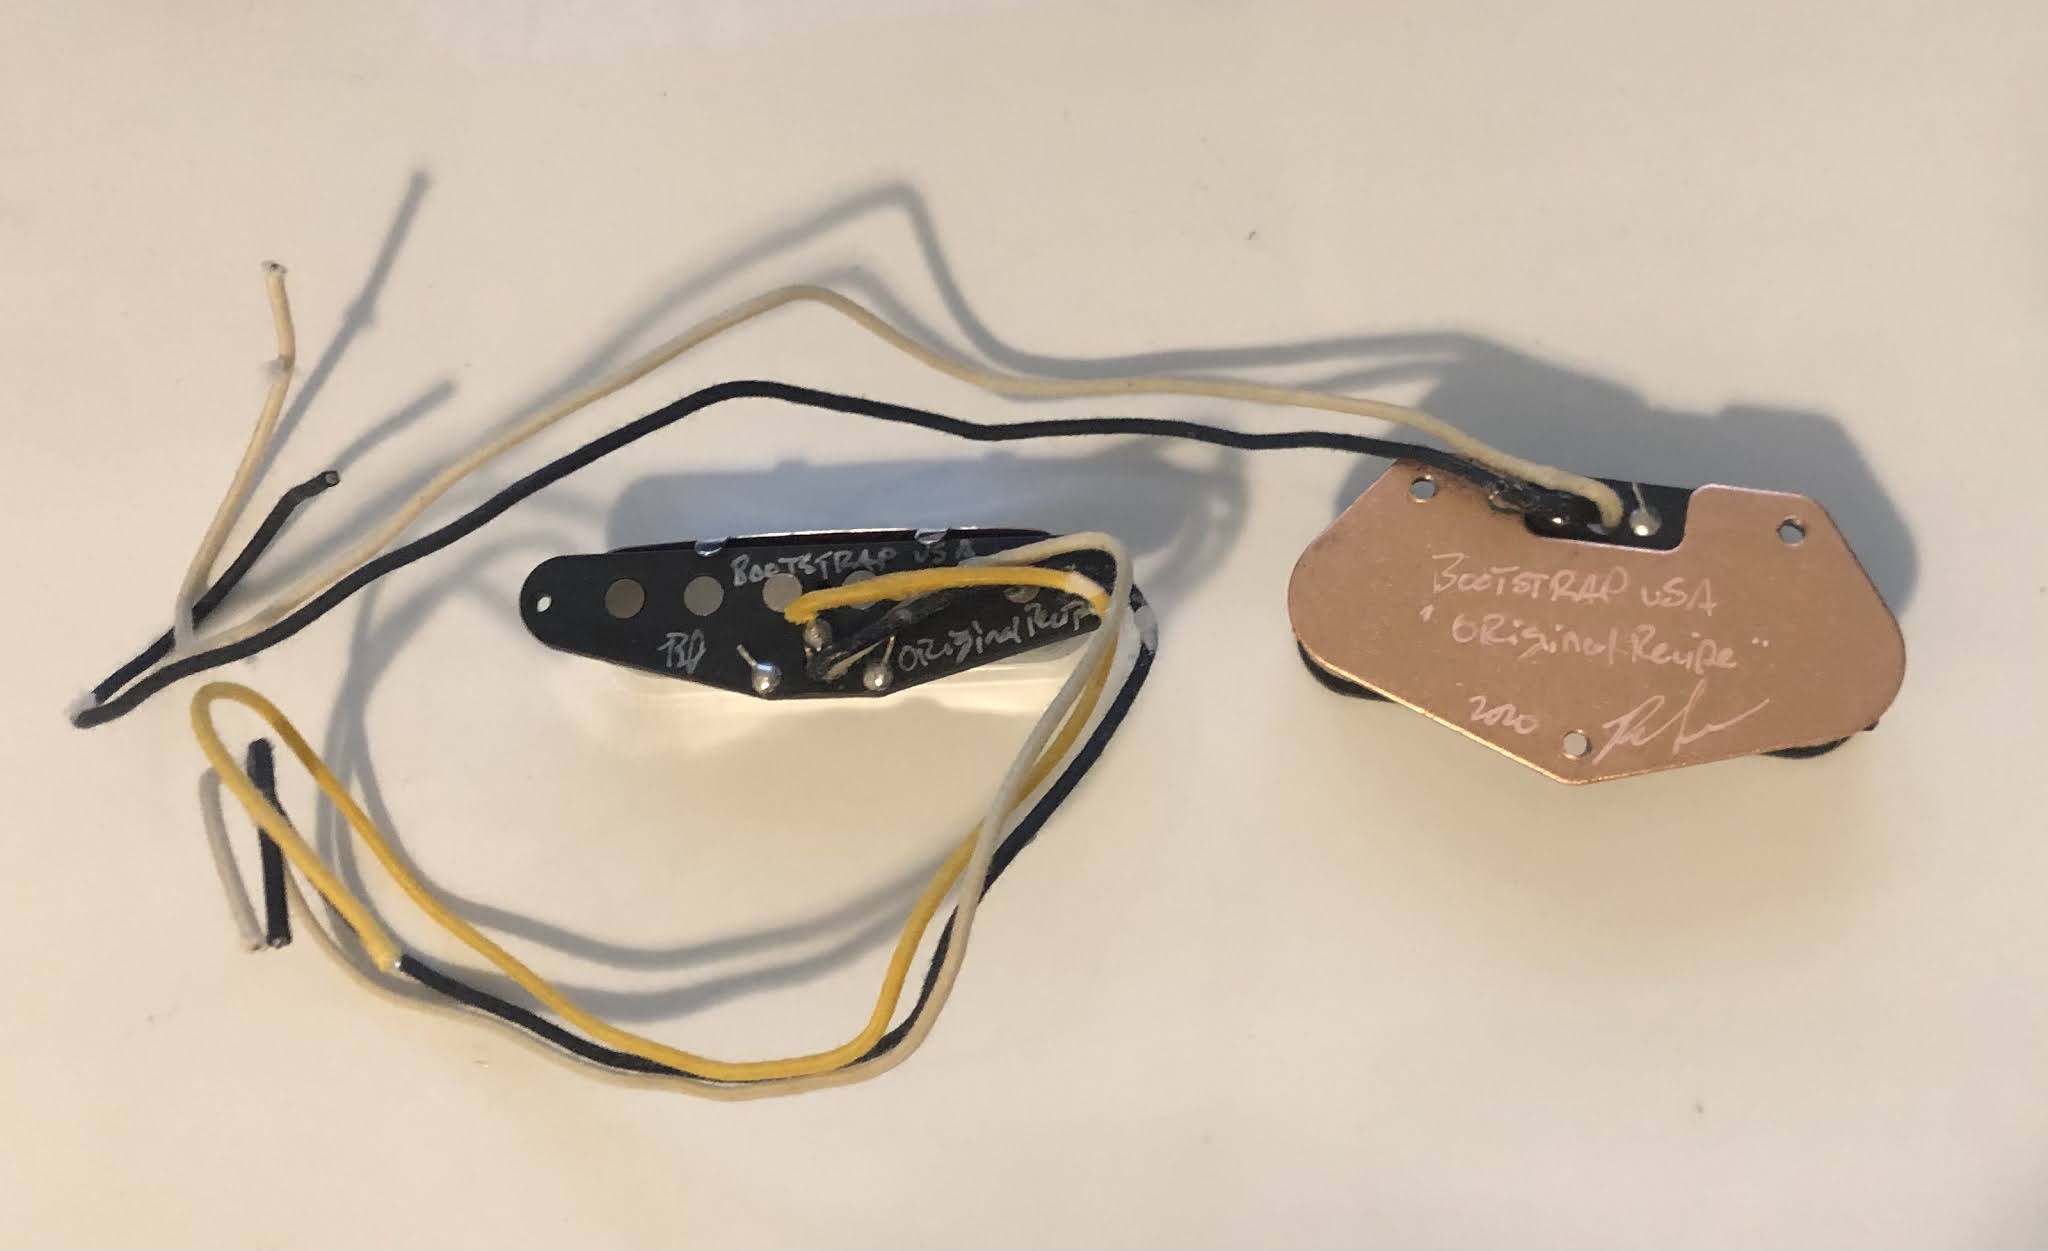 |
| Bootstrap Pickups Original Recipe Set. |
One of the projects that I have been putting off for a while is the installation of new pickups in my Malden Mozak offset tele-type guitar. It is my only Tele-type guitar, and my main reference for the Telecaster tone. The balance between the stock bridge and neck pickups was ultimately something that I thought could be improved on the guitar. The bridge position hit the front end of my amps in a pleasing way, but the neck position was dark and quiet.
 |
| Malden Mozak. |
I bought a set of Bootstrap Original Recipe Alnico III pickups as a cost effective upgrade to the stock Alnico V pickups. It took about a month for me to get the pickups in the fall of 2020, and I knew that the wait times would only increase as the brand got more popular. The current price for these US-made pickups is still less than some import sets I was considering like the Tonerider Tele pickups. The DC resistance of the pickups are 6.32kohm for the bridge and 7.20kohm for the neck. I had forgotten that the DC resistance of the bridge pickup was lower than the neck pickup.
The Malden Mozak will be modified as follows:
 |
| Bridge saddle swap prior to pickup swap. |

 |
| After bridge saddle installation and pickup swap. |
