Featured Post

Click for Links to Cabinet IRs/NAM Captures

Saturday, March 26, 2022

Fractal Audio FM3

Fractal FM3.

Was I bought a Fractal Audio FM3 to see what I was missing in the amp modeling world. The number of Marshall models was the main driver to getting the unit. There are flavors like Plexis with large bright caps that the Line 6 do not offer. The early reported bugs with the FM3 appeared to be resolved as the product matured.

Initial Impressions

I checked out the 59 Bassguy and 65 Bassguy presets using my Supro Hampton guitar and like the clean/breakup sounds that I was able to get. I then jumped over to the Plexi 50W preset. The gold foil pickups work well with hitting the front end of these models. The IRs suited the presets well. I played around with the bright cap settings on the Plexi 50W High 1, and enjoyed having the ability to dial in 100pF and 5000pF settings.

The Bassman amps were better than the Helix counterparts with humbuckers for my tastes. With single coils, I like both devices. The Plexi models are much more versatile on the FM3 than the Helix with the ability to dial in the bright cap. The models are better suited for more rocking humbucker sounds, although the Brit Trem Brt is still my favorite Helix model. The Marshall models in the Helix are more mid-60s bass-spec flavored than the Metal Panel ones on the FM3. I am a big fan of bass spec amps, but I do like the gainer 70s sounds from time to time.

I now do understand the gripes about front panel editing on the FM3. It’s much much quicker to edit on the HX Stomp front panel. I was a bit overwhelmed with the menus on the FM3 and felt much more comfortable using FM3 Edit to make changes to presets. It’s going to take some time to figure out how to best utilize the foot switches along with a Mosky Dual Switch.

Portability

I  began to prefer a more compact setup while using the HX Stomp, to be able to play and record in remote locations. The HX Stomp will still be my primary remote setup since I have it running on battery power. I do want to try to use the FM3 to record DIs remotely to reamp later. Input levels on the FM3 were 1.5dB lower at 440Hz and 1kHz, so I can use DIs between units interchangeably. 

I originally envisioned mounting the FM3 on a pedalboard to take advantage of all the routing options when I was first on the waiting list. However, I learned with the HX Stomp that I was much less adventurous than I had thought with routing and interfacing with other equipment. I found that I wasn’t using the loops to interface external pedals or stereo outboard much. I was mostly inserting loaded down tube amps in one loop.

As an Audio Interface

USB recording and reamping was a major consideration when looking into the FM3 again. When I was originally on the FM3 waiting list, there were apparently USB performance that needed to be worked out to minimize pops and clicks at typical ASIO buffer sizes.

Not all is fixed. The Axe-FX III and FM3 don’t properly report latency to the host DAW as an audio interface. With the ASIO buffer size at 128 samples and the FM3’s hardware buffer at the default 1536 samples, I get just under 10ms of reported latency with the FM3 connected to my desktop. There is however an additional 2149 samples of latency not reported to Reaper. The latency seems to depend on the active blocks in a preset. With shunt blocks from input to output, the additional latency becomes 1168 samples. I can enter these offsets into Reaper’s preferences and print sample accurate reamps through the USB connection. 

Short clip of a few FM3 Plexi models in a mix.

To be continued.

Friday, March 18, 2022

Speaker Impulse Response Updates

I have been reshooting some more impulse responses of my speakers, knowing that I will have to put most of my gear into storage in June. The links on the download page are always updated to the latest attempts.


For my remaining immediate projects, I decided to stick with the following microphones:
  • Shure SM57
  • Beyerdynamic M201TG
  • Sennheiser E906
  • Oktava MK-012
  • Beesneez Lulu FET
  • Beesneez BU87I C

Cabs finished so far:
  • Jet City 2x12 - Celestion Greenback
  • Jet City 2x12 - Celestion V-Type
  • Eminence 1x12 - Weber Ceramic Blue Dog
  • Eminence 2x12 - Classic Lead 80
  • Eminence 2x12 - Vintage 30
  • Tech 21 1x12 - Speed Shop A12Q
  • Roland 1x10 - Jensen C10Q
  • Roland 1x10 - Jensen C10R

Cabs I can hopefully finish:
  • Pro Junior IV 1x10 - Jensen P10R
  • Roland 1x10 - Eminence GA10-SC64
  • Vox Pathfinder 1x10 - Vox Bulldog

I have been enjoying mixing my latest Celestion IRs in Ignite Libra from STL Tones. It is satisfying to blend through my set of speakers to come up with my own tones. 

Thursday, February 10, 2022

Roland VSR-880 Recording and VSWE

I pulled out my Roland VSR-880 to record again for fun. I used it to record some basic tracks, to transfer into my DAW to be edited and mixed.

Roland VSR-880 for remote recording.

I had converted it to record to SD card a few years back, but quickly moved onto recording remotely with a Steinberg UR-44 with an iPad. Going back to the VSR-880 and changing up my workflow has led to some inspiration to record.

Video of a recording tracked to the Roland VSR-880.

I find myself enjoying the constraints of fitting all my instrumentation into 8 tracks. It could be interesting for further limit myself to 6 tracks on my lower fidelity Roland VS-880EX. I need to refer to the manual to remind myself how to use the unit after every layoff. When I am regularly working with the unit, I have the key sequences memorized to compound actions.

A number of users have contributed on the VS Planet forums over the years to refining VSWE to move files off of the VS units as conveniently as possible. I was able to get Version 1.25 from one of the users through email, which allows for the 24-bit VSR-mode encoded files to be extracted.

I don’t know if VSWE will continue to work beyond Windows 10. The application was only updated through the Windows 7/8 era. I will occasionally use it for the oddly-inspiring novelty as long as my Windows setup can support the software. I am slowly transitioning to a Mac-based DAW, and already use an iOS-based remote setup.

Saturday, January 22, 2022

Acoustic Instrument Recording Experiments

I’ve been dipping my toes into recording with mics again, after using guitar amp sims, IRs, VST instruments, and samples for years.

I started to convince myself that recording acoustic guitar at home and remotely would be viable. I quickly learned that choosing guitar picks was integral to the sound. I initially went with the brightest pick that I could find, a thin 0.60mm Dunlop Ultex. I thought the 3U Audio Black CM1 was a good starting point. 

Yamaha FG700S played with Ultex pick, recorded with Black CM1 mic.

I then experimented with darker tones by switching to picks like a 0.70mm Dunlop Tortex in the clip below. I wanted to minimize my small bedroom’s sound, so I started to use my dynamic mics. I wasn’t happy with the noise floor of a cranked mic preamp in my setup. I added a Cloudlifter CL1 to my setup, and got comparable output/noise to my other SDC mics. The Beyerdynamic M201TG works well on acoustic guitar for a dynamic mic, and it’s hypercardioid pattern rejects some room sound.

Alvarez AMPE915EAR Parlor played with 0.70mm Tortex pick, recorded through Beyerdynamic M201TG, Cloudlifter, and Warm Audio TB12.

I have also gotten interested in recording drums with minimal microphones. I am not a drummer, more of a guitarist who decided to hoard drums. I will try out mono overhead, Recorderman, and Glyn Johns-style mic setups for my lo-fi compositions. I’ll stick with Superior Drummer with my more conventional ideas. I’ve been recording just 4 pieces so far: a Gretsch Energy 22”x22” bass drum, a Pork Pie 6.5”x14” Big Black brass snare, a 22” K ride, and a set of New Beat hi-hats.

Drums with mono overhead.

I expanded my condenser mic collection to capture both stringed instruments and drum overhead: 3U Audio Teal CM1 SE, Oktava MK-012, Beesneez Lulu, and Beesneez BU87I C.

BeesNeez BU87I C recording my Alvarez ABT610E Baritone Acoustic.

3 U Audio Black CM1 and Teal CM1 SE microphones used to record Alvarez AMPE915EAR parlor acoustic.

To be continued.

Thursday, December 30, 2021

Next Project - Type M2 Attenuator

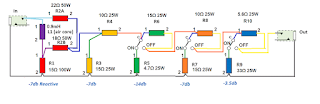
My next project is an 8 ohm 50W attenuator to use with my tube amps. I came across a reactive circuit by JohnH that has become very popular on the Marshall Amp Forum over the past few years.  Many users have reported positive results in volume reduction while maintaining the integrity of the sound. The M2 design attempts to approximate the speaker impedance curve of a 4x12 cabinet with Celestion Greenbacks with minimal number of components. This reactive first stage of the design is made up of three large resistors and an inductor to achieve 7dB of attenuation. Subsequent attenuation stages are purely resistive networks to bring levels further down.

The attenuation  range of the M2 attenuator in the example build is -7dB to -31.5dB, in 3.5dB steps. My plan is to adapt the concept to achieve a range of -14dB to -38.5dB for my needs. This will be done by using a two fixed 7dB attenuation stages, and three switchable steps of 3.5, 7, and 14dB.

Layout and wiring mockup in AutoCAD.

M2 Attenuator wiring modified for my use.
I am using a Hammond 1444-22 chassis to mount all the passive components on the same plane.

Preparing the chassis to be drilled out.

All resistors are from Ohmite/Arcol (100W, 25W) and Vishay Dale (50W). The inductor is a Dayton brand 0.9mH 18AWG air core inductor from Parts Express.

Edit - 1/1/22 - I had to ask users on the Marshall Amp Forum for advice on applying thermal compound on the heat sink resistors. I am hopeful that I’ve applied enough compound for sufficient heat transfer from the resistors onto the chassis.

Resistors populated and (-) wiring soldered.

Edit - 1/2/22 - And it works! The wiring came together fairly quickly. I fired it up with my Jet City JCA22H head on the Overdrive channel with the master volume at about 10:00. At full attenuation, the amp is at low conversation volumes. My 50W Plexi-circuit amp is much louder through the attenuator, at moderately loud TV volumes.

Completed wiring of attenuator.

I put up a Shure SM57 on my Jet City 24SVe 2x12 with a Greenback. I set the attenuator on the maximum -38.5dB setting, and cranked the gain on my Stam SA73 preamp. I was able to record a quick clip sitting 5 feet away from the cabinet with IEMs for monitoring. I need to work on mic placement, but it is an encouraging first step in actually recording the Plexi circuit rather than rely on IRs.

I later played the same riff, but recorded it in 3 different scenarios:
  1. Attenuated heavily and mic’d with a Beyerdynamic M201.
  2. A post-power amp line out. The Suhr Reactive Load acted as a simple line out with the attenuated speaker load connected to the Thru jack.
  3. Through the Suhr Reactive Load, as a separate take.
I made an impulse response of the speaker and mic to apply to the last two setups. I am satisfied with any of the methods to tame the 50W Plexi circuit. It is more satisfying to put up a mic myself and hearing the speaker in the room as I record. Having the option of applying IRs after the fact is a flexible way to work. I originally thought about installing a line out into the attenuator, or buying a line out box from David Bray Amps. Then I remembered that the Suhr Reactive Load already offered this functionality in a transformer isolated flavor. 


Edit - 2/27/22 - I hastily recorded some guitar tracks using the attenuator between my Winfield Typhoon head and my Eminence 1x12 loaded with a Weber Blue Dog. 14dB of attenuation got the 5W amp down to comfortable low volumes for recording.


To be continued…

Friday, December 3, 2021

5E3 Head Build Power Up

5E3-inspired head chassis with tubes installed.

I fired up my 5E3 head build after my final sanity checks. I connected it to my Suhr Reactive Load into my DAW as my bedtime approached. I was relieved to get a healthy, low noise signal. I used my Monoprice guitar with GFS Mean 90s as my test guitar and the P90 noise was tolerable even with all the EMI and dirty power.

I installed typical modern tubes:

  • V1: EH 12AY7
  • V2: EH 12AX7
  • V3 and V4: JJ 6V6
  • V5: JJ 5Y3GT

With a wall voltage of 121VAC, the measured DC voltages off the three 22uF filter caps were 382V, 329V, and 241V. This is perhaps a little bit higher than the desirable range for a 5E3 circuit (350-370V).

I recorded a quick open chord passage using my Monoprice Indio Classic V2 guitar with GFS Mean 90 bridge pickup. The first pass uses a Weber Ceramic Blue Dog SM57 impulse, the second pass a GA10-SC64 SM57 impulse, and the final pass a C10Q M201TG impulse. The tone knob was maxed and the bright volume was set at 12:00. I still have a lot of the nuances of the amp to explore, but the basic sound of the amp is great. I immediately knew that the sound of the 5E3 circuit was more to my liking than the 5F1 circuit.

I will mainly be playing this amp loaded down and with IRs applied for now. I like how the amp sounds with the Ownhammer 1012 TWEED and York Audio VLUX 210 P10R libraries. I will have to dig deeper into the older Redwirez and Ownhammer libraries that I have to find IRs that I like. I may look into the CabIR.eu and Tone Junkies Tweed libraries the future.

Edit -12/8/21 - I had read about the interactive controls of the amp, but did not expect some of the more extreme results. I came across the so-called “better than blackface” setting by turning the unused normal channel volume to maximum or almost that value. This dropped the gain of the bright channel significantly: the amp can stay clean up to about 12:00 with bridge PAF-level bridge humbucker guitar on the bright channel when dialing back the tone knob. The amp is otherwise breaking up by about 9:00-10:00 on the volume dial. I would imagine that there would be even more headroom with a single coil guitar, and will try soon.

Edit - 12/21/21 - I had to reflow the solder on the V3 heater pin 2. I noticed that the tube wasn't glowing when playing through the amp the other night. The amp sounded a bit off, and it looked like there was asymmetrical clipping from looking at recorded waveforms.

Difference in positive and negative parts of waveforms. 

I did not get a dropped voltage on V3 pin 3, but rather the full B+ of 378VDC at the time. I believe that this is a recent development, since both power tubes are typically glowing. It must have been a bad solder joint on the tube pin eyelet itself. I perhaps narrowly averted disaster before I blew the output transformer, or burnt out other components.

Once I verified continuity on all filament tube socket pins, I powered up took down all relevant voltages using a cheap Tenma multimeter. I will check the voltages again with a calibrated Fluke 289 meter.

Voltages measured at tubes.


B+ voltages 

My B+ measurement was lower this time around. Perhaps this means that there was a problem further back in time. The wall voltage was lower by 1VAC this time however. 

Monday, November 15, 2021

More 5E3 Head Progress

I found some time to finish drilling the Hammond chassis for my 5E3 head. I made some more mistakes (eg. a misaligned input jack), but it didn’t turn out too bad for a hand drilled chassis.

Drilled chassis for 5E3 head.

Progression of populating chassis hardware.

The location of the power transformer’s mounting holes were not as precise as I had liked. I was able to get everything to line up in the end.

Chassis with components mounted.

It may have taken a while to get the chassis drilled, things seem to be moving quickly. I am just about to be ready to start soldering wires onto the components.

Chassis with transformer wiring.

I am using a combination of reference documents to build the amp.

Edit - 11/22/21 - I finished soldering the 120VAC wiring into PT primary. The color coding of the Classictone 40-18066 primary wiring is odd: the line connection is white and white-black, while the neutral is black and black-white. I had to double check the diagrams a few times.

AC input wiring into PT.

I shortened all of the transformer wiring, too hastily. I used a forum post in regards to the Classictone 40-18022 OT phase as reference, only to later find another forum post that contradicted the information.  I traced the 5E3 schematic and looked at the Mojotone instruction manual to double check, and it does look like I botched the wiring. I mistakenly ran the Yellow lead to V3 Pin 3, Green lead to V4 Pin 3. The diagram below is my proposed fix on the speaker jack side. 

Edit - 11/23/21 - I dressed the heater wiring based on typical Marshall-style layouts. My tube socket spacing is tighter than the average Plexi layout, so it was a bit of a nuisance to get done. It’s not as neat as I would like.

Edit - 11/29/21 - I ran all of the preamp wiring off the turret board side and soldered about half of those wires in. Once I have the turret board completely soldered, I will start trimming and routing the wiring onto the various tube sockets, pots, and jacks. 

I see why most 5E3 builds have heater wires installed above the tube sockets rather than along the chassis Marshall-style. The wires for V2 are located in the middle of the typical 5E3 board, while the tube socket itself is closer to one end of the chassis. I will soon commit and hope that I don't screw up the layout of the tube socket wiring.

5E3 turret board wiring progression.

Edit - 12/2/21 - I finished making all the connections to the chassis. I quickly did a continuity check on various connections to make sure that I didn’t have any routing errors. I fired up the amp through my Suhr Reactive Load.

I still need to drill a few holes for the vented cage that will sit above the chassis to complete the amp.

All connections soldered.


Friday, October 15, 2021

Monoprice Indio Classic V2 Pickup Swap - GFS Mean 90s

I jumped on a Monoprice Indio Classic V2 guitar on sale for $84 before sales tax. I’ve been on the lookout for an inexpensive HH guitar to stick my unused GFS Mean 90 humbucker-sized P90 pickup set into for a while now. I previously had these pickups in my Ibanez SZ520QM and enjoyed the tones from all positions.


Monoprice Indio Classic V2 prior to pickup swap.

I wasn’t particularly inspired by the sound when I initially played through my HX Stomp. I am hoping that the pickup swap will change that. The nut is a bit sloppily cut, and I may address it in the distant future. The frets are a bit rough when bending strings, so a good polish is in order.

Stock control cavity.

I quickly took a peek inside the control cavity to see what I would be dealing with. The pots were measured to be under 500kohm, at approximately 440kohm. I may reuse the pots, pickup switch, and jack. The tone cap is a 0.047uF, which I plan on swapping out for an Orange Drop 0.022uF cap that I have as a spare part. I will shield the control cavity with copper tape.

Edit - 10/25/21 - I took out the stock pickups in the guitar. The stock bridge and neck humbucker DC resistances measured 15.42kohm and 8.14kohm respectively. The bridge humbucker was fairly hot and strident for my tastes. The neck pickup wasn't too muddy for such a cheap guitar.

GFS Mean 90 wiring splices insulated with electrical tape.

I cut the stock pickup leads about 1.5" away from the pickup switch, and spliced with the leads of the Mean 90s. I didn't have all of the materials (heat shrink, copper tape) to fully complete the installation. I insulated the hot conductor splices with 3M Super 88 tape, then wrapped the overall splice.

Mean 90 wiring, excerpted from this TalkBass post.

The bridge Mean 90 (8.76kohm DCR) is much lower output than the stock bridge humbucker, and much more suited to my tastes. The bridge position is more low mid heavy and not as aggressive as the Wolfetone Meaner P90 in my SX Hawk guitar. The neck Mean 90 (7.95kohm DCR) provides an open, uncompressed sound in comparison to a typical neck humbucker. The tone of a P90 neck pickup with higher gain is much preferable to me than a humbucker.

The only downside to these P90 pickups is the hum. The middle position is hum cancelling; when switched back to a single pickup, the noise is quite noticeable. I am hoping that shielding the control cavity will lower the buzz that I get when facing a particular direction.

GFS Mean 90 pickup set mounted into Monoprice Indio Classic V2.

Full body shot of guitar with Mean 90 pickups.


Clips to come eventually.

Friday, August 13, 2021

5E3 Lunchbox Head Continued

I’ve been dragging my feet to get started with my 5E3 head build. I finally put in a few orders with Valvestorm and Mouser to get the last few jacks and tube sockets needed for my 5E3 lunchbox amp. I had about an hour to get as much of the tedious drilling done.

Preparing the chassis with my layout.

I committed to my layout and started drilling into the Hammond aluminum chassis. I immediately drilled the board mounting holes to make sure that I did not blow my measurements of the turret board. The board appeared to be laid out in metric units, while my layout was drafted in imperial units. My previous mounting hole layout was off by 1/32” for one of the turret board holes. I was fortunate to have a good fit when I committed to drilling.

Checking the turret board’s fit.

I moved onto punching the octal tube sockets with my Greenlee 1-3/16” hole punch, which went smoothly. By the end of the hour, I had drilled the pilot holes to punch the preamp tube sockets.

Punching the rectifier and power tube sockets.

I plan on finishing the preamp tube socket work next time. The top of the chassis has roughly the same amount of work as the front and rear panels combined. I am not looking forward to the Powercon drilling, since my punch (1-3/16”) is slightly bigger than the recommended connector hole diameter (1-1/8”). The holes for the mounting screws can get a bit too close to the connector hole, as it did on my Plexi build.

Edit - 10/22/21 - I haven't had access to an environment conducive to drilling for a while. I finished drilling the top and the rear sides of the chassis today. I was rushing through the process and made one of the output transformer mounting holes too large, which will have to be remedied with some additional washers. Drilling by hand went smoothly for the most part. The PowerCon chassis hole didn't turn out as well as I had hoped, but will be usable.

Top of drilled chassis,

Drilled hole for PowerCon connector.

I will need about half an hour to drill the front panel. Then the fun part comes with component mounting, and later the anxiety-inducing step of soldering.

To be continued.

Tuesday, August 10, 2021

Line 6 HX Stomp Battery Power with Mission 529M

I recently downsized my HX Stomp pedalboard, after establishing my workflow with the unit. I went to a battery powered solution for both portability and convenience. The goal was to be able to quickly set up the Stomp for playing or for mobile recording without having to think about finding an outlet nearby. Another desire was to take advantage of the Stomp's small size to play through it as much as possible.

HX Stomp with battery concealed underneath.

The Fix Pedalboards FP-7X Pedal Riser (6.75" x 5.125" x1.5") is approximately the size of the HX Stomp. I was able to comfortably fit an Anker 10,000 mAH battery, a Mission Engineering 529M power converter, and a USB coupler underneath the Stomp. 

HX Stomp with Pedal Riser.

The 5V 3A current rating of the Anker Powercore 10000 PD Redux is sufficient for the HX Stomp through USB PD, and provides about 3 hours of power. 

The 5VDC out of the PD output of the battery is converted to 9VDC using the Mission Engineering 529M. I went with the Mission 529M due to the Ionic Audio 5V to 9V converter being unavailable for purchase for an extended amount of time.

Battery cabling under Riser.

The 2.1mm center negative output of the 529M needed a combination of Truetone CYR (reverse polarity) and CL6 (2.1mm to 2.5mm, reverse polarity) adapters to interface with the 2.5mm center negative input of the HX Stomp.

A USB coupler is used to reduce wear and tear on the HX Stomp's USB port.


I keep the HX Stomp in an Apache 2800 case from Harbor Freight.

I hear less background noise through my headphones when the Stomp is running on batteries. Whatever noise I was getting previously was likely due to dirty power, desktop fans, sharing a power strip with multiple pieces of equipment, etc. I don’t know if it comes through on recorded DIs, but it is a much more pleasing experience to be monitoring my signal with less noise.

Edit - 11/1/21 - I was successfully able to power my Steinberg UR44 audio interface using the Mission 529M set on 12V. The UR44 requires center positive DC, which was achieved through a polarity inverting cable. The UR44 is not buss powered through USB2, but the 529M along with the Anker battery should provided hours of operation with phantom power engaged.

Going forward, I plan on doing remote acoustic recording with the UR44 and DI recording with the HX Stomp into my iPad Pro. I can do both without the need for an AC outlet nearby.