Featured Post

Click for Links to Cabinet IRs/NAM Captures

Wednesday, June 28, 2023

DIYRE EQP5 Pultec EQ Kit

DIYRE EQP5.

My first foray into the world of 500 series modules is with the DIYRE EQP5 Passive EQ kit.  The build includes the vintage option using all stock components, except for the Warm Audio X731 op amp that I had layng around.

I was hoping for the CAPI 511 rack to become available as the foundation of my 500 series journey, but couldn’t wait for it to come back into stock. A promotional summer sale of the Fredenstein racks pushed me over the edge to move past waiting for the CAPI. I ended up with a Bento 8, after reading some positive reviews indicating that the power supply was improved over older models.

Fredenstein Bento 8.

Edit - 7/21/23 - I built GAR AM10 and OA10 op amps for the EQP5 to try a non-API flavor in the EQP5. These are Quad Eight and Neumann circuits respectively. The OA10 is described as the warmest of the GAR op amps, and I wonder if this means I can push the high shelf control up a little more without getting harsh. I haven’t compared these two op amps side by side yet, but will be an interesting exercise to see if my preconceived notions hold up.

GAR AM10 and OA10 op amps.

Running drums into the EQP5 with the EQ flat adds a subtle tonal change at unity gain with the OA10 installed. The level seemed to drop a few tenths of a dB with the Warm X731, so I was glad to have built the GAR op amps. The push-pull trick with the LF controls tightens up the kick drum without making it sound smaller. Being able to boost/cut 30Hz or 60Hz independently is a nice subtle detail. The HF boost at 10k gives sparkle to cymbals, but is subtle enough to avoid harshness.

For bass guitar, I wanted a little more control over the frequencies. I liked what the HF boost did on dreadnaught acoustic guitar recorded with my mid-heavy Beesneez BU87I C.

To be continued.


Thursday, June 22, 2023

Squier Paranormal Jazzmaster XII


12 String Jazzmaster.

I preordered the Squier 12 string Jazzmaster when I saw that it was available. The build of the guitar was solid. The fixed bridge probably eliminated many of the quirks associated with setting up a Jazzmaster. The neck felt good, although it took me a minute to adjust to a 12 string guitar.

My initial impression from playing through the amp models in my HX Stomp was that I would mostly play this guitar clean or mildly overdriven. I prefer to focus on chord inversions rather than play full barre chords to hear the octave effect. 

Saturday, June 10, 2023

DIY Pipe Insulation Tube Traps

Tube trap wall.

I bought some 3ft long Owens Corning fiberglass pipe insulation to make DIY tube traps. I went with two sizes: 6” pipe (2” wall) and 10” pipe (1-1/2” wall). The 6” model’s outer diameter is slightly larger than the ASC 9-1/2” Studiotrap. The 10” model was the largest pipe size I could easily source with free shipping, but it’s outer diameter (13-3/4”) is smaller than the ASC Isothermal (16”) and GIK Turbo Trap Pro (17”)  models that I looked at. 

Pipe Size

Model

Thickness

O.D.

6”

722568

2”

10-3/4”

10”

722592

1-1/2”

13-3/4”


10” pipe insulation, with 14” wood cap.

Pipe insulation with fluffy insulation inside.

Half-length sections filled.

I glued 10” and 14” wooden craft circles to seal off the ends with Liquid Nails adhesive. I decided to use some remaining pink fluffy insulation that I wanted to stuff these tubes with, after reading that GIK uses additional insulation in their tube traps. I had leftover bleached muslin fabric to wrap the fiberglass. I made the mistake of trying to wrap the traps over a thin plastic tarp, which resulted in many tiny folds. The traps turned out much neater using hardboard as a surface.

Tube traps surrounding speaker.

I took a few quick measurements with and without the top 14”x18” tube trap placed above the speaker. The traps seem to help above 145Hz.


My initial plan is to use the tube traps in a similar manner as the ASC AttackWall Starter Kit. When the budget permits, I’d like to build some tube traps to surround my drums.

Sunday, April 2, 2023

Behringer A800 Power Amp

Behringer A800 on top.

I bought a Behringer A800 power amp to power a pair of Realistic Minimus 7 speakers as a secondary monitor reference. At $200, it was cheaper than most new budget stereo rackmount power amps. An Audio Science Review of the A800 had encouraging measurements of frequency response, good enough for my monitoring purposes. I am monitoring at fairly low volumes, so I am barely cracking the dials and not pushing this power amp to its limits. The Minimus 7 and A800 combination are a good alternative reference to my JBL LSR305. The mids on the Minimus 7 are very noticeable, making it apparent when snares or guitar volumes are unbalanced. Yet the sound is not as lo-fi as an Avantone Mixcube; listening experience is still pleasing.

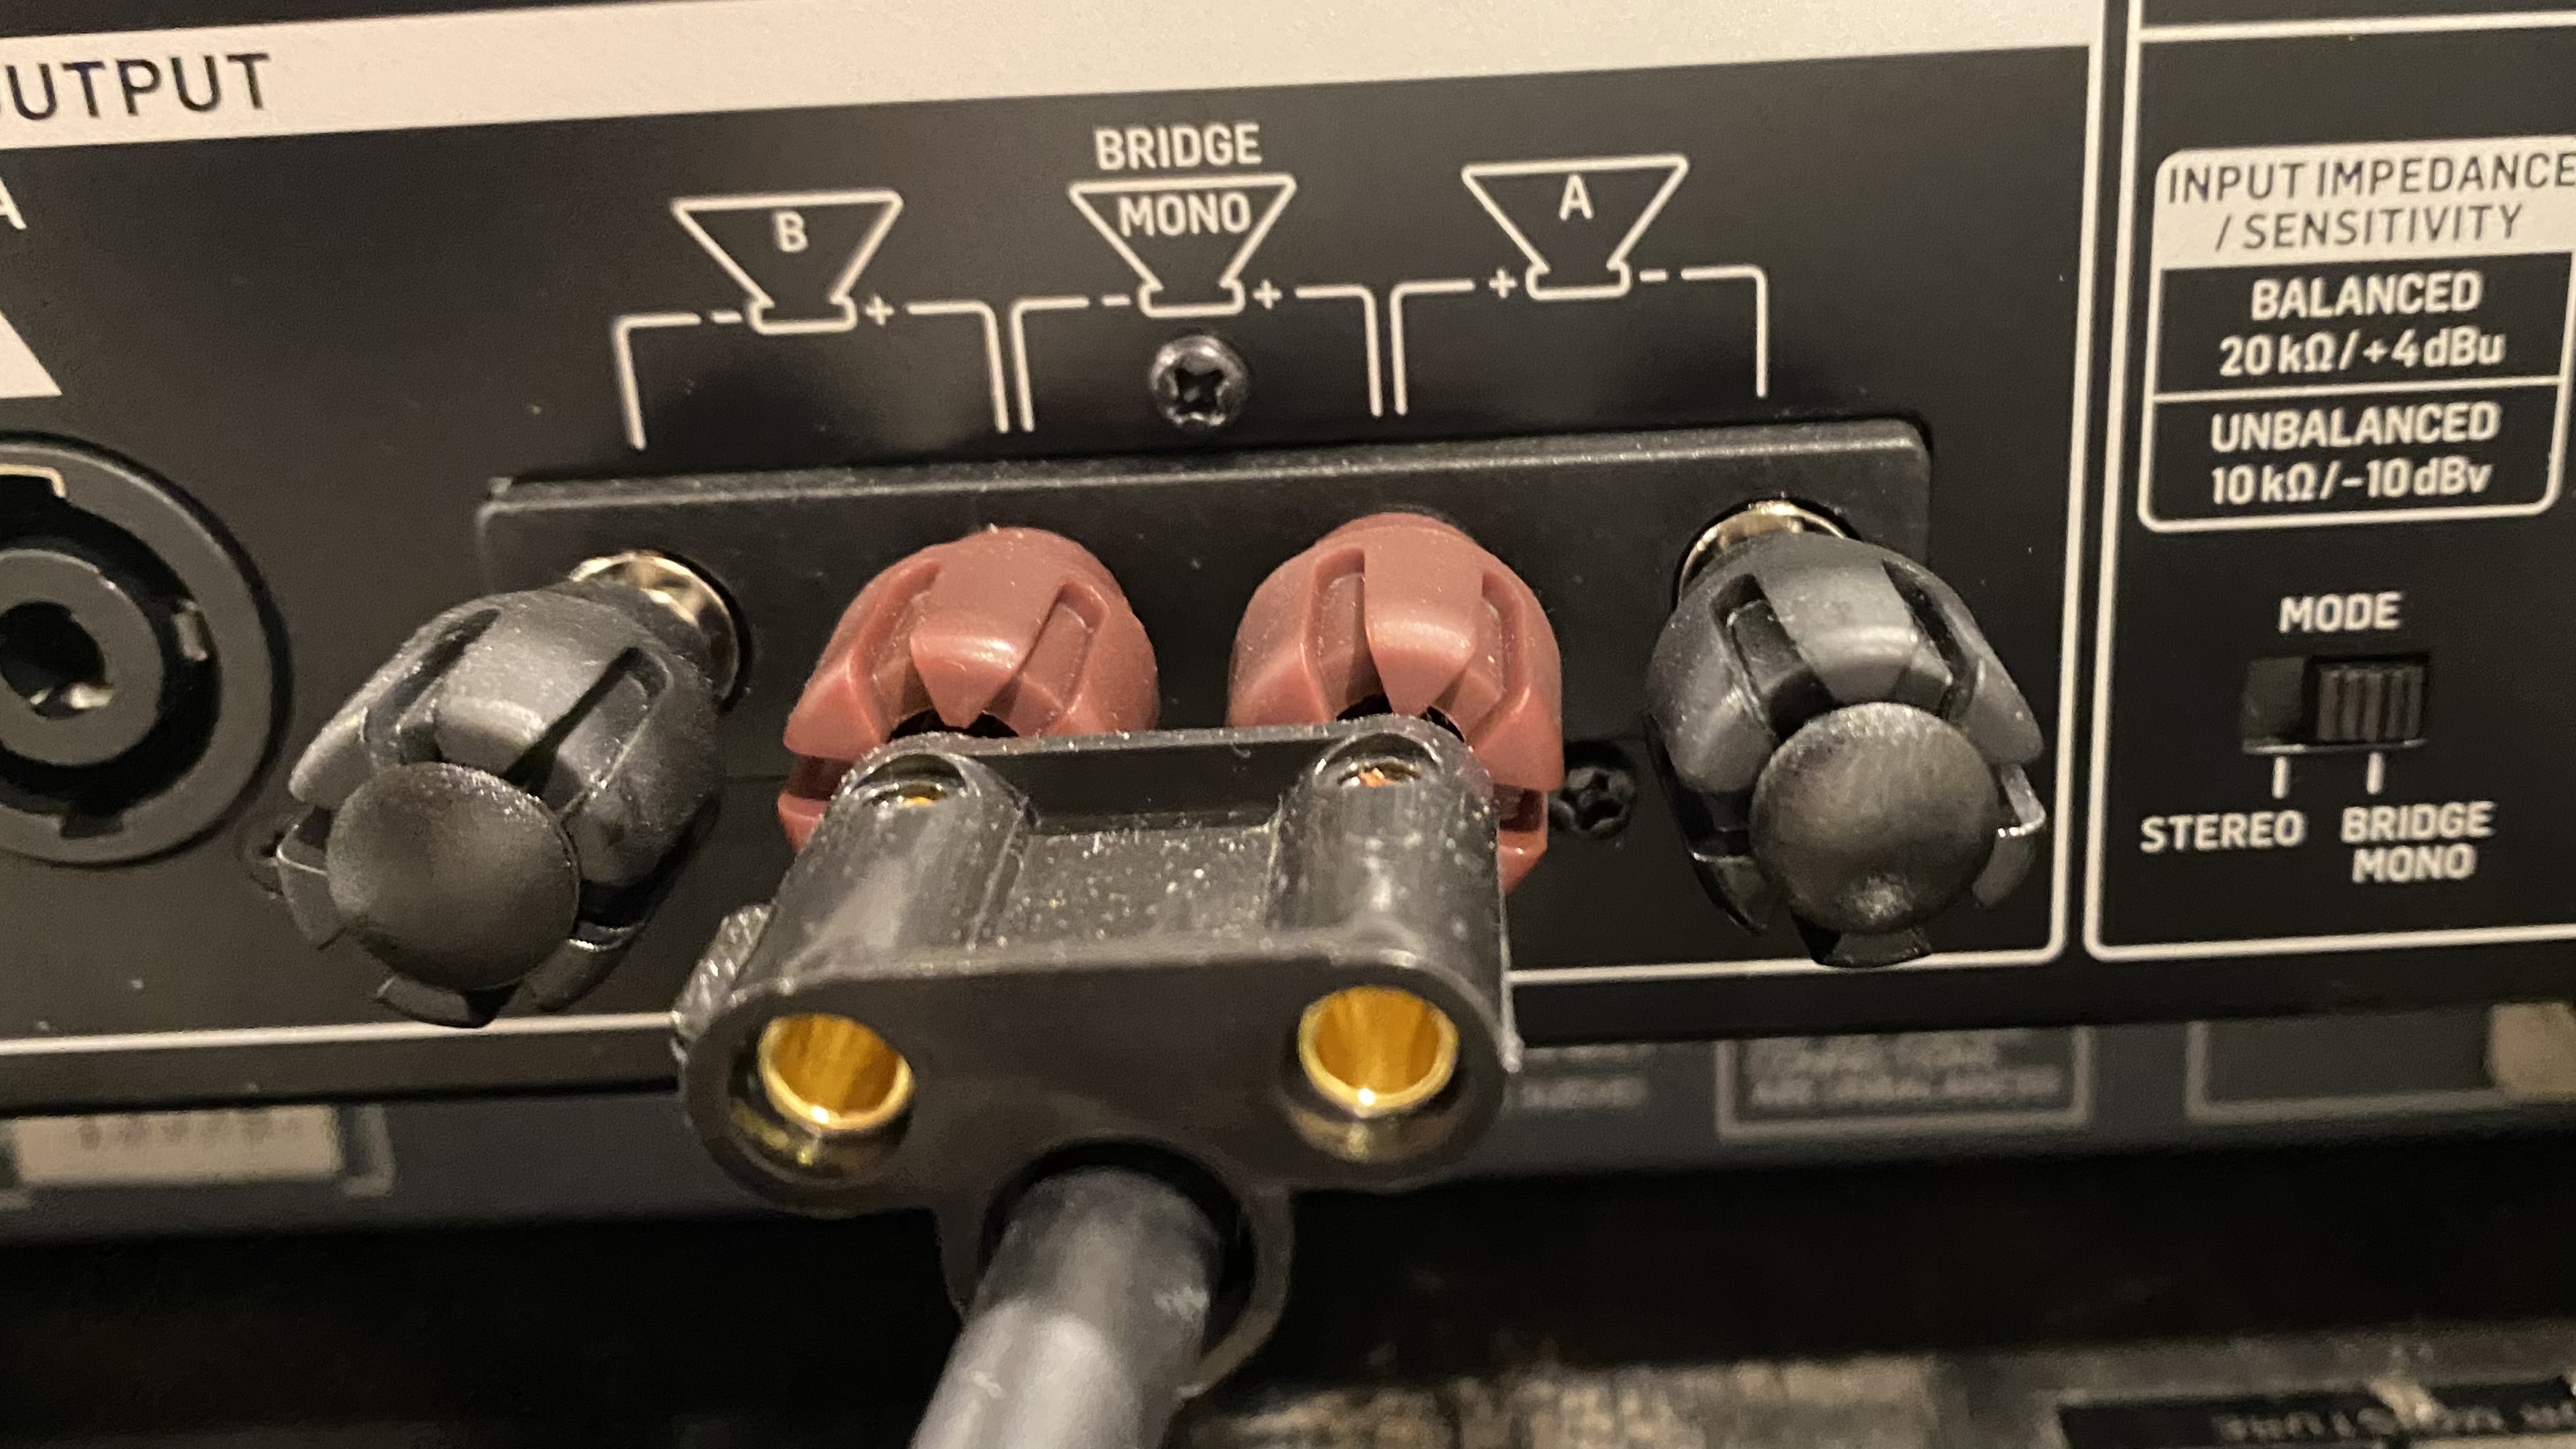
Running the A800 in Bridge Mono for guitar amp.

I tried using it as a mono power amp to make some guitar cabinet impulse responses. Coupled with a Chameleon Labs 7603 microphone preamp, I was able to get finally capture IRs that had a sufficient low end to my liking. I didn’t know how to accurately dial in my Seymour Duncan Powerstage 170 to be flat response in the low end for this application.

I've started reshooting my cab IRs. I started with my cabs with the Greenback, Creamback G12H75, Vintage 30, Weber Blue Dog, Jensen P10R. I plan on streamlining the mic selection to a SM57 with Crimson Orange handle, Beyerdynamic M160, Beyerdynamic M201, Beesneez BU87I C, and Sennheiser E906.

Saturday, January 28, 2023

Corner Bass Trap Build

I’ve been looking into building some more absorptive panels for my room. I wanted to build something as close to a floor-to-ceiling corner superchunk as I could. I wanted more coverage than my 24”x48”x4” OC703 panels could provide. I wanted to crudely emulate the rectangular GIK Soffit Traps.

I bought a roll of Johns Manville R30 fiberglass insulation since it was the most readily available and least expensive option at the time. I will be cutting 15”x15” pieces of insulation, and stacking into a 37” high frame. Using 2”x2” furring strips, the external dimensions of each frame is 18”x18”x37”. The base is 1/4” plywood, while the top cap is 1/8” hardboard. Each front corner will get two of these frames.

Frames to be filled with fluffy insulation.

I originally thought of using PVC moulding to hide the staples and fabric edges. I may go the frugal route and use white tape instead.

I bought a couple of bags of Rockwool Safe N Sound to make 6” deep panels for reflection points. These panels will hopefully cut down on any ugly slapback reflections for when I record drums. I am using the cheapest 1”x8” ledger board from Home Depot. These frames are less labor intensive than the ones for the R30 above. The wood is pretty rough, and will require sanding. I plan on painting the boards a few coats of white.

8” Ledger Board Frame for 6” Rockwool.

Edit - 4/21/23 - I completed the rectangular fluffy traps and 6” Rockwool panels. A single layer muslin isn’t enough to hide the wood underneath; a second layer is needed for a uniform white look. It’s not so much of a concern with the Rockwool panels, but the fluffy frames really needed the second layer.

15.5”x 71”x6” Safe N Sound panel.

Left corner.

Right corner.


Room layout.

I used Room EQ Wizard to measure the effect of the panels on the left side of the room, since the bass response was most uneven on that part of the room. The image below shows measurements of the untreated corner (red), OC703 4" corner panel (blue), and the new fluffy traps with early reflection panel (green). The treatment improved the nulls at 99, 124, 156, and 185 Hz. 

Room EQ Wizard 40Hz to 400Hz

The low end is still ugly, but there is a tangible difference. There is still a buildup of 60-80Hz that I will have to investigate, Perhaps some rockwool place above the ceiling tiles in my listening position will help evening out the response. 

Edit - 4/26/23 - I moved my speakers closer to the wall (18” vs 4”) and the bass response evened out considerably. The 300Hz range worsened, so I will need to experiment with monitor placement a bit more.

Edit - 2/16/24 - I started to build some more frames again, experimenting with different lumber sizes. One method I’m trying is to glue 1x4 furring strips together to achieve 7” actual depth. The 1x4 lumber typical does not have as many twists as the 8” boards that I was sourcing from Home Depot. I can further straighten out a furring strip when I clamp a crooked one with a straighter specimen. A reinforced frame with outside dimensions of 33”x72”x7” requires 7 total 1x4 strips at $3.32 each. 

1x4 furring strip frame.

1x8 kiln-dried softwood board frame.

One layer of muslin fabric.

To be continued.

Tuesday, August 9, 2022

New Home Recording Space

I will finally get to have most of my gear in one place as I move into a new house. I will have some room to set up my amps and drums for quick home recording. The basement’s 7ft ceilings aren’t ideal for acoustic recording, but I’ll try to use some of my hypercardioid mics to minimize the room’s influence. 

Empty basement for my recording space.

I may re-use my 24"x48"x4" OC703 panels as bass traps in the corners. I plan on buying a bag of 16” wide Rockwool Safe N Sound insulation to build four smaller 16”x72”x6” panels to tame early reflections. I’ll probably move the same panels around between tracking and mixing.

A major goal is to have my gear readily available so I can lay down an idea quickly. That may be electric guitar through a hardware modeler, MIDI performance on a controller/pads, drawing in notes on a piano roll, or mic’d drums/guitar. All of my MIDI controllers will be plugged in and ready to play. I will be using my existing audio equipment for the immediate future.

I am using an inexpensive L-shaped desk from Best Buy: the Walker-Edison Command Center Gaming Station desk on sale for $158. This desk provides me the most desktop real estate for the least amount of money. It’s not the best desk for this studio application, since there are no shelves for rack equipment. I do have old IKEA Rast nightstands that I will use as rack enclosures. As I progress with the move in, I would like to get some of my outboard rack equipment and Tascam M30 mixer set up on the desk. I am still in the planning stages for any cable management that will need to be installed to minimize clutter.

First iteration of the main desk.

Edit - 12/31/23 - I filled out the space a bit after moving all of my equipment in.

Guitar amp cabinets.

Drum kit.

Recording rack.

Amp modelers.

Tube amp rack.

Updated rack with newer 500 series.


Thursday, March 31, 2022

Speed Shop A12Q Speaker

Speed Shop A12Q speaker.

After some deliberation, I ordered a Speed Shop A12Q AlNiCo speaker to use with my 5E3 head. I was deciding between the Weber 12A125A and the Speed Shop A12Q for a while. The A12Q is a 20W Weber speaker built to Speed Shop’s specifications. It’s described as an idealized Jensen P12Q sound, supposedly with less highs than the 12A125A.

The positive reviews of the Speed Shop speaker on various forums led me to purchasing one. The price difference between the speakers was negligible. The speaker is still within the 12A125 family, so I ended up supporting both companies.

Weber identification sticker for A12Q.

It took exactly 2 weeks to take delivery of the speaker. The speaker’s build date was a week after my order went in, earlier than the quoted build date.

Speaker mounted in cabinet with grill removed.

I put the speaker in an unloaded Tech 21 1x12 cabinet that I got directly from Tech 21 for $57, including shipping. The cabinet is used interchangeably for the Tech 21 Trademark 60 and Power Engine 60 amps. Although the whole cabinet might be MDF, the Trademark series seems to be respectable enough from a tonal standpoint. I had to buy some 10-32 x 1 1/4” bolts to mount the speaker. It didn’t come with any speaker wire, so I bought a Fender internal combo speaker cable to wire up the speaker. I spent about $230 for the whole cabinet assembly, so I’m not concerned about getting a 100% authentic pine cabinet Tweed Deluxe experience. I do want to experience the 5E3 circuit through a Jensen-voiced 12” speaker rather than a Celestion.

Less than ideal speaker cable mounting.

I was able to use the power cord holder to secure the speaker cable’s make TS jack. I am connecting to an external speaker cable using a female to female 1/4” coupler. The speaker cable termination isn’t the most elegant installation, but I don’t want to sink any more money into the project.

A12Q speaker in Tech 21 1x12 cabinet.

I am liking how the speaker sounds in the room with the 5E3. I am of course taking impulse responses of the speaker cabinet to learn more about how my modelers and amps sound through the speaker at different mic positions. My initial observations from listening to the speaker are that there are more low mids and less highs than I expected. I am moving my dynamic mics back about an inch off the grill due to the proximity effect. The captures of mics close to the center of the dust cap are very useable.

Link to IRs: here

While my focus is on getting tones with the 5E3 pairing, I may have stumbled upon some good sounds with my 5F1/5F2A amp. I ran some WAVs of the loaded down amp through IRs and really liked the tones in isolation. 

Edit - 1/13/25 - I hadn’t been getting along with the speaker as well as I had hoped in the Tech 21 Cabinet. The tone seemed to be too focused in the lows and mids. It prompted me to buy a Weber 12A125A to chase the ideal 5E3 tone. Over the past few months, I’ve paid a little more attention to matching speakers and cabinets. I first moved the 12A125A into my Eminence XTC112-BT cabinet, and shot IRs with my mic collection.

I have moved onto the A12Q and have a much better appreciation for the speaker now. It now sounds like the 12A125A with a bigger low end and less of a 5k spike. The honky mids are gone and the speaker is much more usable.

To be continued.

Saturday, March 26, 2022

Fractal Audio FM3

Fractal FM3.

Was I bought a Fractal Audio FM3 to see what I was missing in the amp modeling world. The number of Marshall models was the main driver to getting the unit. There are flavors like Plexis with large bright caps that the Line 6 do not offer. The early reported bugs with the FM3 appeared to be resolved as the product matured.

Initial Impressions

I checked out the 59 Bassguy and 65 Bassguy presets using my Supro Hampton guitar and like the clean/breakup sounds that I was able to get. I then jumped over to the Plexi 50W preset. The gold foil pickups work well with hitting the front end of these models. The IRs suited the presets well. I played around with the bright cap settings on the Plexi 50W High 1, and enjoyed having the ability to dial in 100pF and 5000pF settings.

The Bassman amps were better than the Helix counterparts with humbuckers for my tastes. With single coils, I like both devices. The Plexi models are much more versatile on the FM3 than the Helix with the ability to dial in the bright cap. The models are better suited for more rocking humbucker sounds, although the Brit Trem Brt is still my favorite Helix model. The Marshall models in the Helix are more mid-60s bass-spec flavored than the Metal Panel ones on the FM3. I am a big fan of bass spec amps, but I do like the gainer 70s sounds from time to time.

I now do understand the gripes about front panel editing on the FM3. It’s much much quicker to edit on the HX Stomp front panel. I was a bit overwhelmed with the menus on the FM3 and felt much more comfortable using FM3 Edit to make changes to presets. It’s going to take some time to figure out how to best utilize the foot switches along with a Mosky Dual Switch.

Portability

I  began to prefer a more compact setup while using the HX Stomp, to be able to play and record in remote locations. The HX Stomp will still be my primary remote setup since I have it running on battery power. I do want to try to use the FM3 to record DIs remotely to reamp later. Input levels on the FM3 were 1.5dB lower at 440Hz and 1kHz, so I can use DIs between units interchangeably. 

I originally envisioned mounting the FM3 on a pedalboard to take advantage of all the routing options when I was first on the waiting list. However, I learned with the HX Stomp that I was much less adventurous than I had thought with routing and interfacing with other equipment. I found that I wasn’t using the loops to interface external pedals or stereo outboard much. I was mostly inserting loaded down tube amps in one loop.

As an Audio Interface

USB recording and reamping was a major consideration when looking into the FM3 again. When I was originally on the FM3 waiting list, there were apparently USB performance that needed to be worked out to minimize pops and clicks at typical ASIO buffer sizes.

Not all is fixed. The Axe-FX III and FM3 don’t properly report latency to the host DAW as an audio interface. With the ASIO buffer size at 128 samples and the FM3’s hardware buffer at the default 1536 samples, I get just under 10ms of reported latency with the FM3 connected to my desktop. There is however an additional 2149 samples of latency not reported to Reaper. The latency seems to depend on the active blocks in a preset. With shunt blocks from input to output, the additional latency becomes 1168 samples. I can enter these offsets into Reaper’s preferences and print sample accurate reamps through the USB connection. 

Short clip of a few FM3 Plexi models in a mix.

To be continued.

Friday, March 18, 2022

Speaker Impulse Response Updates

I have been reshooting some more impulse responses of my speakers, knowing that I will have to put most of my gear into storage in June. The links on the download page are always updated to the latest attempts.


For my remaining immediate projects, I decided to stick with the following microphones:
  • Shure SM57
  • Beyerdynamic M201TG
  • Sennheiser E906
  • Oktava MK-012
  • Beesneez Lulu FET
  • Beesneez BU87I C

Cabs finished so far:
  • Jet City 2x12 - Celestion Greenback
  • Jet City 2x12 - Celestion V-Type
  • Eminence 1x12 - Weber Ceramic Blue Dog
  • Eminence 2x12 - Classic Lead 80
  • Eminence 2x12 - Vintage 30
  • Tech 21 1x12 - Speed Shop A12Q
  • Roland 1x10 - Jensen C10Q
  • Roland 1x10 - Jensen C10R

Cabs I can hopefully finish:
  • Pro Junior IV 1x10 - Jensen P10R
  • Roland 1x10 - Eminence GA10-SC64
  • Vox Pathfinder 1x10 - Vox Bulldog

I have been enjoying mixing my latest Celestion IRs in Ignite Libra from STL Tones. It is satisfying to blend through my set of speakers to come up with my own tones. 

Thursday, February 10, 2022

Roland VSR-880 Recording and VSWE

I pulled out my Roland VSR-880 to record again for fun. I used it to record some basic tracks, to transfer into my DAW to be edited and mixed.

Roland VSR-880 for remote recording.

I had converted it to record to SD card a few years back, but quickly moved onto recording remotely with a Steinberg UR-44 with an iPad. Going back to the VSR-880 and changing up my workflow has led to some inspiration to record.

Video of a recording tracked to the Roland VSR-880.

I find myself enjoying the constraints of fitting all my instrumentation into 8 tracks. It could be interesting for further limit myself to 6 tracks on my lower fidelity Roland VS-880EX. I need to refer to the manual to remind myself how to use the unit after every layoff. When I am regularly working with the unit, I have the key sequences memorized to compound actions.

A number of users have contributed on the VS Planet forums over the years to refining VSWE to move files off of the VS units as conveniently as possible. I was able to get Version 1.25 from one of the users through email, which allows for the 24-bit VSR-mode encoded files to be extracted.

I don’t know if VSWE will continue to work beyond Windows 10. The application was only updated through the Windows 7/8 era. I will occasionally use it for the oddly-inspiring novelty as long as my Windows setup can support the software. I am slowly transitioning to a Mac-based DAW, and already use an iOS-based remote setup.